Showing posts with label bread. Show all posts

Sunday, 22 June 2014

Ultimate Beans on Toast

Everybody loves beans on toast. It's a student staple, and is perfect for a quick hunger fix at the end of a long day. But it doesn't have to be just emptying a tin into a saucepan - with a few more basic larder ingredients and an extra five minutes, you can transform it into something spectacular.


Ingredients (serves 2):
- 1 small red onion, chopped
- 1 clove garlic, finely chopped
- ½ a red chilli
- 1½ x 400g tins baked beans
- 200g tin kidney beans, drained and rinsed
- handful fresh parsley
- 4 slices bread, toasted and buttered
- handful grated cheddar cheese

Alternatively, you could just use two tins of Heinz 5 beans, though they're a bit more expensive unless you can get them on offer.

1. Pour a dash of olive oil and a knob of butter in a saucepan, and add the onion, garlic and chilli. Cook for five minutes until beginning to soften, then tip in the kidney beans.
2. Add the baked beans and simmer, stirring regularly, until they're beginning to go slightly mushy (or however you like them - this is my preference). Add the parsley and a twist of black pepper.
3. Pour the bean mixture over the toast, and sprinkle over the cheese. Enjoy!


Tuesday, 18 February 2014

Apple and Cinnamon Soda Bread: Guest Post by Ruby Tandoh


Since reaching the final of series 4 of the Great British Bake Off, Ruby has been writing for The Guardian and working on her cookbook, Crumb, which is due to be released in Autumn this year. I was lucky enough to meet her last year through my position with the London Student, and, as we stood nervously in line waiting to meet Nigel Slater together in December, she kindly agreed to write me and Zosia a guest post. So here it is!  


Made with bicarbonate of soda rather than yeast, this gently sweet, crumbly loaf takes just one hour to make. It relies on the near-instantaneous chemical reaction between the soda and the acidic buttermilk for its rise, so make sure your oven's preheated and ready in advance so that the bread isn't left waiting. If you can't find buttermilk (although most supermarkets should sell it), use 200ml of sour cream topped up with 100ml of milk.


 Ingredients:
- 300g wholemeal flour, plus extra to dust
- 1tsp bicarbonate of soda
- ½ tsp salt
- ½ tsp cinnamon
- 2 small dessert apples, finely diced
- 300ml buttermilk
- 2tbsp honey

Method:
1. Preheat the oven to 180°C/fan 160°C/gas mark 4.
2. In a bowl, combine the flour, bicarbonate of soda, sat and cinnamon. Toss through the small cubes of apple then stir through the buttermilk and honey. You'll be left with a wet, sticky dough.
3. With floured hands, on a floured work surface, shape the dough into a rough ball. No need to worry too much about neatness here - it's a pointedly rustic-looking loaf (or so you can claim!).
4. Transfer the shaped dough to a baking tray, dust lightly with flour and score a deep cross into the top with a sharp knife. Bake for 50 minutes until golden.


More of Ruby's recipes can be found in The Guardian, or on her personal blog, Ruby and the Kitchen.

Sunday, 20 October 2013

Our Daily Bread

It's said that man cannot live on bread alone; however, we are a house of women.

 
I've always eaten a lot of bread, and loved making it, but I hadn't done much over the last two years because gluten free bread is just so difficult. Now though, I'm back on full-baking-form, and between us Jamie and I are making a loaf of bread every few days. 

It's the easiest thing, and so cheap to make. Seriously - a 1.5kg bag of bread flour costs 80p, the 7g of yeast costs about 4p, and 1½ tsp of salt would be about 0.3p. Which brings the cost of a basic home-made loaf of bread to about 40.3p!

The thing that puts a lot of people off making bread is the time needed to make it, but that's one of the reasons I love it. Spend 15 minutes on the initial mixing and kneading, then go to campus for a few hours of lectures. By the time you get back you'll have a beautifully risen dough with minimal amounts of effort! 
So give it a go.

Basic White Loaf - Ingredients:
- 675g strong white bread flour
- 7g yeast
- 1½tsp salt
- 450ml warm water

Method:
1. Mix the dry ingredients together in a large bowl, then make a well in the centre and pour in the water.
2. Using your hands, mix everything together until you get a dough. If it's too dry you can add a little more water, but if it's on the wet side try your best to work with it rather than adding flour as a wet dough often leads to a better loaf.
3. Sprinkle your worktop with flour, then turn out your dough and knead for 10-15 minutes, until it's silky smooth and elastickey. If you're not sure about your kneading technique I recommend youtube - there are thousands of videos with instructions and demonstrations.
4. Put your dough back in the original bowl and cover with cling film, then leave it alone. It needs at least an hour and a half to prove, but it can really be left for as long as you need it to be.

Before and after proving
5. Tip out the risen dough and knead for a couple more minutes, then shape and place on a greased baking tray. Cover with cling film and leave for another hour or so.
6. Heat your oven to 230°C. Take off the cling film and, using a sharp knife, cut a few slashes diagonally along the top of the dough (you can also dust it with a little bit of flour at this point to achieve a more rustic look), then stick it in the oven.
7. After 15 minutes, turn the oven temperature down to 200°C, then bake for a further 20-25 minutes (the initial blast of heat will give you a better crust).
8. Remove your beautiful creation from the oven and transfer to a wire rack if you have one, or just a likely chopping board if you don't. You should leave it for at least 15 minutes before attacking it with mounds of butter, though in our house we can never wait that long.


Thursday, 1 August 2013

Super Simple Summer Lunch

It's. So. Hot. Which means I have much less energy for cooking (and blogging - sorry about the big gap between posts), so I need things which are really quick and easy to make while still being yummy. This fits all of those and is also one of my absolute favourite things to eat.


Ingredients (serves 2):
- 4 big vine tomatoes
- 2/3 pack of feta cheese
- 7-8 basil leaves
- olive oil
- salt and pepper
- some good bread, to serve

1. Slice the tomatoes to about 2mm thick and place into a large baking dish, then tear the basil leaves and scatter over the top.
2. Slice the feta so it's roughly the same size and thickness as the tomatoes, then layer that on top.
3. Generously drizzle some olive oil over the whole thing, then season with salt and pepper. 
4. Cook at 200°C for about 25 minutes. 

And voila. Easy as that. Use the bread to mop up all the lovely juices so you don't miss out on anything!


Saturday, 13 July 2013

3 Ways to Make Garlic Bread

I make garlic bread a lot. Like, once or twice every week. We have it with risotto. Or with pasta. Or with savoury rice. Or with stew, sometimes, or vegetable bakes... You get the picture. Anyway, I end A LOT of posts with 'serve with garlic bread' and it's in millions of pictures - and I recently realised I'd never actually blogged a recipe for it. My bad!

The basic recipe is the same for all three variations, all that differs is how you put it together and cook it. It's the easiest thing, and I promise once you've had it shop-bought garlic bread will never seem the same again.

Ingredients:
- butter: enough to cover however much bread you have.
- garlic: one clove per person.
- drizzle of olive oil
- squirt of lemon juice
- handful of chopped parsley (or a good sprinkle of dried)
- salt and pepper

Method:
Chop the garlic as finely as you can and stick everything in a bowl. Mix it up. THAT'S IT. Told you it was easy.


Now, the different kinds...

1. This is my favourite sort, and the easiest.
Grab yourself some part-baked bread (tesco usually has 4 batons for £1, and it freezes like a charm). Cut open and spread with your garlic butter. Bake according to the instructions on the bread packet.


2. This is great if you haven't got any of the part-baked bread, but do have general bread.
Slice your bread, but not quite to the bottom. This way all the butter stays in better, and it's fun ripping it when it's cooked (if you have ready-sliced bread, don't worry, keep reading). Use your garlic butter to spread your slices on both sides then press them together, before wrapping it all up in tinfoil and baking at 200°C for about 20 minutes.


3. This one's for if you have some time on your hands. It will impress, though!
Make yourself some pizza dough. Spread with your garlic butter (not quite to the edges) and cook at 220°Cfor 10-15 minutes, until it's all golden.


ALSO, any of them can be made gluten free. For the first two, quarter a few slices of gluten free bread and then cook in exactly the same ways. For the third, use gluten free flour. It actually couldn't be easier.

Saturday, 6 April 2013

One ha' Penny, Two ha' Penny (Hot Cross Buns)

I've been meaning to make hot cross buns for years, but somehow never got round to it. The Easter holidays is always full of birthdays and revision for me, and so baking always seemed to get knocked down the 'to do' list until it was suddenly no longer Easter and I felt like I couldn't make them.
BUT NOT THIS YEAR!


Just look at all that sticky goodness. Also, I know they look a bit over-baked but I promise you they don't taste burned and are amazing and you should make them. So there. I adapted Paul Hollywood's recipe, because even though I'd never made them before I still can't just follow a recipe. And my version really is brilliant (if I do say so myself).

Ingredients:  (makes 12)
- 300ml milk
- 375g strong white flour
- 225g strong wholemeal flour
- 75g caster sugar
- 1tsp salt
- 7g sachet fast-action yeast
- 60g butter
- 1 egg, beaten
- 125g mixed fruit (raisins, sultanas, currants... that sort of thing)
- 75g mixed peel
- zest of 1 orange
- zest of 1 lemon
- 2tsp ground cinnamon
- 1tsp grated nutmeg
- sunflower oil, for greasing the bowl
- 50g plain flour mixed with 5tbsp water (for the cross)
- 2tbsp apricot jam mixed with 1tbsp water (for the glaze) 

1. Warm the milk until it starts to boil, then remove from the heat and let it cool to hand temperature.
2. Mix the butter, egg, flours, sugar, salt and yeast together in a bowl. No fancy rubbing or creaming or anything like that, just bung it all in and stir a bit. Try and make sure the salt and yeast don't go straight on top of each other though - salt kills yeast, so if you do that your buns won't rise.
3. Add half of the warm milk and stir, then gradually add the rest. You won't necessarily need all of it - just use enough to bind it all together. Also, don't worry if it's really sticky. It's meant to be. Trust.
4. Add the mixed fruit, peel, spices and zest, then tip out onto a lightly floured surface. Knead for about five minutes (holding the dough with one hand and using the heel of the other to stretch it), 'til smooth and elastic-y, then place it in a lightly oiled bowl (covered with oiled cling film) and put it in the airing cupboard/somewhere warm to rise for an hour.

Before and after rising. Possibly my favourite bit.
5. Divide the dough into 12 even pieces, and roll each piece into a ball. Arrange on a baking tray that's either been greased or lined with baking parchment, so that when they rise again they'll just be touching. Let prove for another hour (I got distracted and proving time here was more like two hours, but it was all fine, so don't worry if you do something similar).
6. Turn on your oven to 220°C at this point, then make up the mixture for your crosses - literally just stir the flour and water in a bowl. Grab yourself a plastic sandwich bag and spoon in the mixture, twisting the top. Cut a small hole in one of the corners, and use it as a piping bag. Pipe across a whole row of buns (rather than doing one at a time), then go the other way to give crosses.

  
7. Bake for 20-25 minutes on the middle shelf of the oven 'til golden brown. Enjoy the brief period of being able to tell your boyfriend you have a bun in the oven and making him laugh/run away screaming (depends on your boyfriend I suppose. Thankfully mine laughed).
8. In a small pan, heat the apricot jam and water 'til they're all mixed together and quite runny. Brush the buns with the glaze as soon as they're out the oven, then let cool and set before ripping apart to serve - if the people in your house can wait that long.


Happy Easter, all.

Thursday, 14 February 2013

Something Different: Roasted Red Pepper Soup

Apologies for the lack of posting this month - I know we always say life's really busy but LIFE'S REALLY BUSY. This should make up for it though.

Every Friday afternoon Jamie and I go into Egham for soup and tea at what we call 'Bar-Divisible-By-Three' to celebrate the end of the week and get into the general Friday-feeling. A few weeks ago I got excited by the prospect of 'roasted red pepper and tomato soup', but when we went to order we were told the cafe had run out. The soup we got was awesome but I couldn't stop thinking about the one that got away... so I made my own. Because stubborn is my middle name.


 You will need:
- 2 onions                                                      - 600ml water  
- 2 sticks of celery                                         - 300ml double cream            
- 1 large clove garlic                                     - 1tbsp red pesto
- 4 large red peppers                                     - 2 handfuls fresh curly parsley  
- 10 cherry tomatoes                                     - plenty of salt and pepper     
- 1x 500ml stock pot, or 2 Oxo cubes                                 

What to do:
1. De-seed and quarter the peppers, then place into a baking dish. Drizzle with olive oil and sprinkle over some salt and pepper, then stir it all up so they're coated. Place into an oven preheated to 220°C, and cook for about 30 minutes, stirring every 10 minutes or so so they don't burn. After 20 minutes, add the tomatoes too. This can be done in advance.
2. Roughly chop the onions, celery and garlic and throw into a stock pot (or any big pan) along with a knob of butter and some olive oil. Cook on a medium temperature for 10-15 minutes, until soft.
3. Add the peppers and tomatoes to the pot, and cook for a further 5 minutes. Lots of recipes tell you to take the skins off the peppers, and you can, but leaving them on gives the soup more texture as well as being healthier. Add the pesto, water, stock, and cream (or you could use milk for a healthier alternative) and mix.
4. Bring to a gentle boil, then put on a lid and simmer for half an hour, stirring occasionally.
5. Using a hand blender/food processor/a sieve and lots of determination, blitz the soup. You can obviously make it as smooth as you like, but I think it's best if it's not done too much so you get the textures still. Chop your parsley and add that in, then season to taste.

 
To give it an extra bit of awesome, while you're on stage 4 and it's simmering away, chop a few slices of bread into cubes along with some sun-dried tomatoes (or a few chopped cherry ones) and put into the baking dish the peppers were roasted in. To this, add a bit more salt and pepper, and if you have it some garlic/basil/nicely flavoured olive oil (normal olive oil is fine), then stir to coat and stick in the oven at 180°C. You need to stir this every 10 minutes or so to make sure they crisp evenly, and after about 20-30 minutes you should have some fancy homemade croutons to go along with your soup.


Voila. Super simple, and super tasty. 

Monday, 21 January 2013

A Post-Snow Warm Up

As is the case for most of the country at the moment, over here we're covered with a blanket of beautiful snow. There have been snowball fights, snow angels and even a snow rabbit, and at the end of the day you need something warm and comforting to come back to - that preferably doesn't require a lot of effort. Enter bread and stew.

I always think of stew as being a bit bland and mushy, and generally not the most appealing. I don't know why because I've never really had it, but this blows the generic 'stew' idea out of the water. It's a take on one by Nigel Slater, and is full of spices and textures and goodness. And as for bread, I've adapted a family recipe to make gluten-free bread rolls. So. Much. Good.


Stew - mine's basically the same as Nigel Slater's recipe, but a vegetarian version with a few extra bits
Ingredients:
- 4 medium onions
- 3 small carrots
- 1 large stick celery
- 1 clove garlic
- ½ tsp mild paprika (you could also use smoked)
- ½ tsp cinnamon
- ½ nutmeg, grated
- 300g Puy lentils (green work fine as a substitute)
- 500ml veg stock
- large handful fresh parsley
- 1tsp sugar
- couple of knobs of butter
- crème fraîche (to serve)

1. Melt a knob of butter in a large pot or saucepan. Roughly chop two of the onions, along with the celery, carrots and garlic, and add to the pan. Cover and let steam for a few minutes, before adding the spices. Stir to coat and cook for a few more minutes. 
2. Add the lentils, stock and 500ml of water. Cover and leave for 30 minutes - stirring occasionally - until the lentils are all soft and nice. 
3. While that's cooking, stick another knob of butter in a small pan. Chop the two remaining onions into fairly large pieces, then add along with the sugar. Allow these to cook slowly and caramelise, and then finish with a grate of nutmeg. 
4. Add your handful of chopped parsley to the lentils along with some salt and pepper, then serve with the onions and a dollop of crème fraîche.


Gluten-free bread rolls - my Mum calls these 'milk rolls' for reasons which will soon become apparent. The gluten-free version makes 8-10 rolls, but you tend to get more out of the regular version.
Ingredients:
- 300ml milk
- 50g butter
- 7g sachet dried yeast
- 1tsp caster sugar
- 500g gluten-free plain flour
- 1tsp salt
- 1 small egg, beaten

1. Place the milk and butter in a pan and heat until lukewarm.
2. Sieve the dey ingredients into a bowl and mix together. Make a well in the centre and pour in the liquid along with the egg. Mix to a soft dough, then spend a few minutes attempting to knead some air in. If you're making the regular gluten version knead well until smooth and elastic.
3. Cover with a damp cloth and leave to rise in a warm place for 30 mins, until increased in size.
4. Turn onto a well-floured surface and have another attempt at kneading for a few minutes. Cut into pieces and shape into rolls.
5. Place on a greased baking sheet, cover and leave in a warm place for another 10-15 minutes. Grab another egg and beat it with a splash of milk, then use this to glaze the rolls. Sprinkle with various seeds to make them all pretty, then bake in a preheated oven at 220°C for 20 minutes.

Voila. I know the snow is causing a lot of disruption and all, but I kind of hope it stays a bit longer. 
Days like these are the best.


Wednesday, 16 January 2013

The Best Treacle Tart Ever.

This year on New Year's Eve life was a bit different. My birthday's on January 1st so usually NYE is birthday party time, but I did NOT want to be 20 and so kept it on the ultra-low this time. Instead Fraser came over on my birthday, and for New Year's Eve Mum's boyfriend came for dinner and Mum and I did uber cooking. 
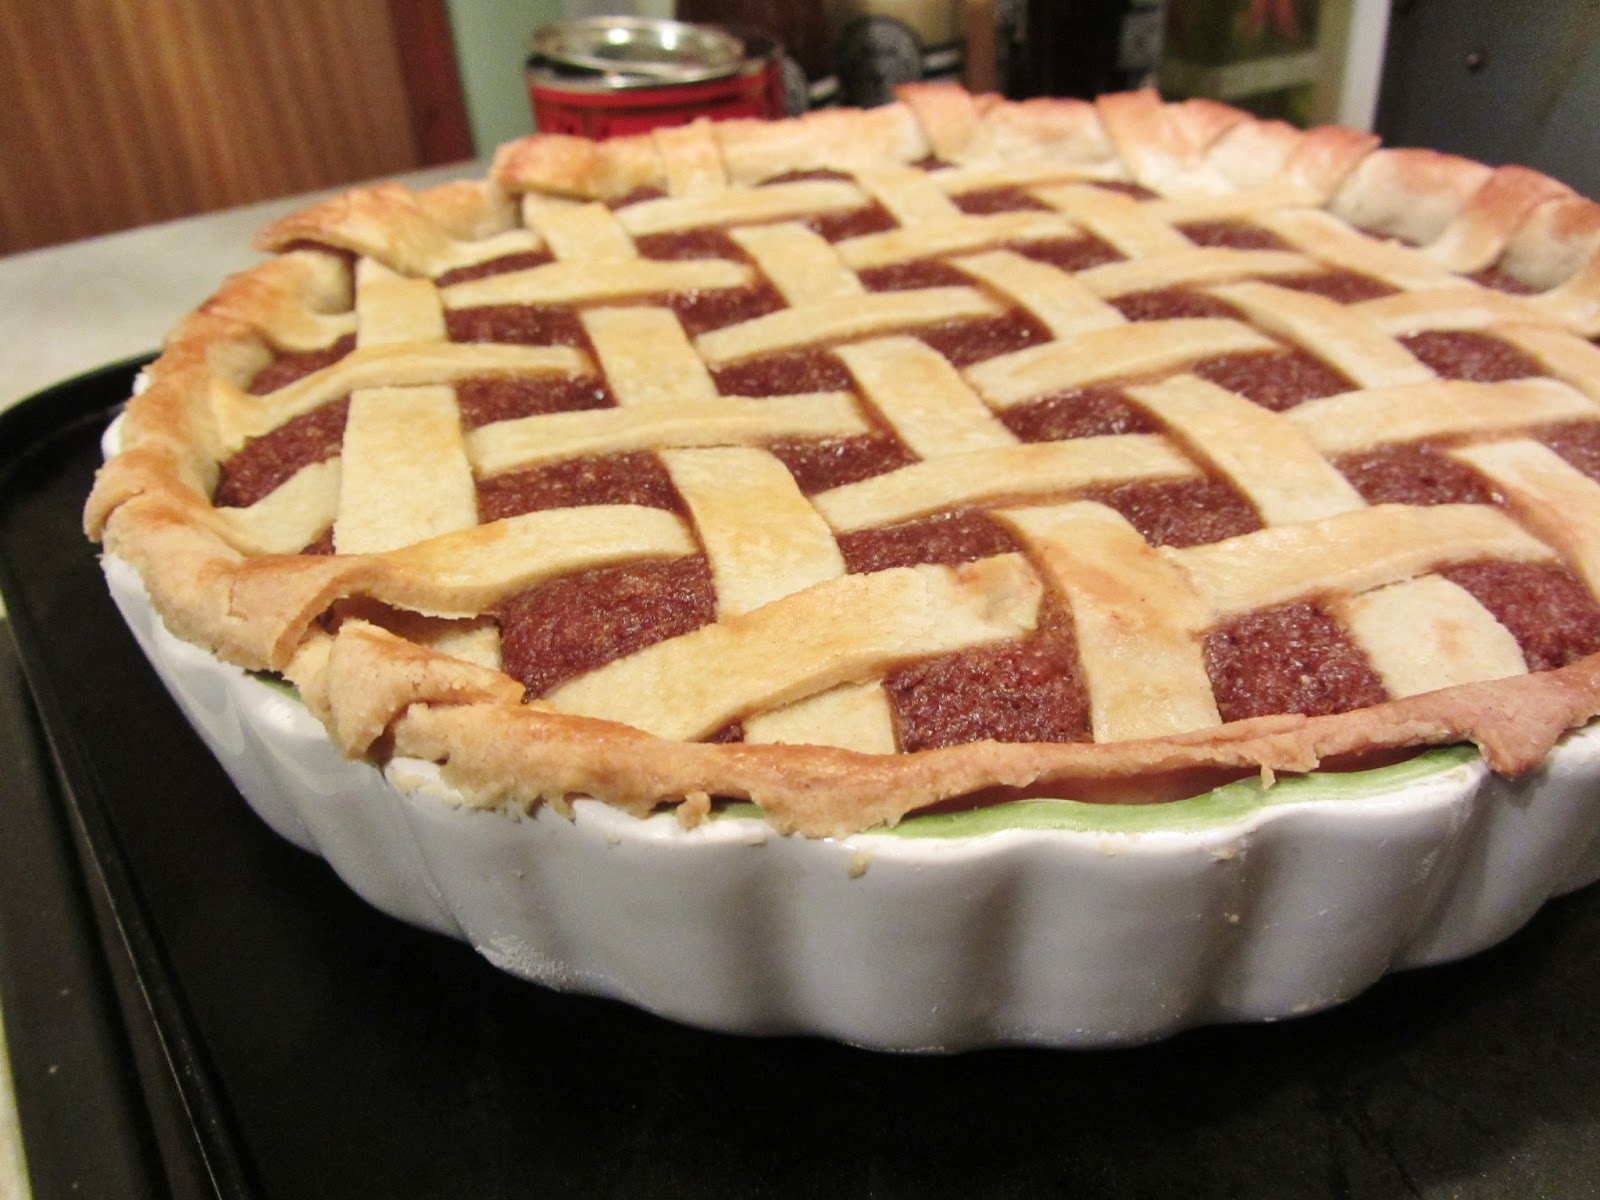
And I made this:


It has been the work of years, and started off as a recipe by Linda Collister in The Great British Book of Baking. And I'm pretty darn proud of it if I do say so myself.

Ingredients:
Pastry                                                                           Filling
- 220g plain flour                                                           - 9 rounded tbsp golden syrup
- pinch of salt                                                               - 3 rounded tbsp treacle
- 1tsp caster sugar                                                        - 150g white breadcrumbs
- 160g unsalted butter, chilled and diced                     - zest of 1 lemon and 1 orange
- 2-3tbsp ice-cold water                                               - juice of half of each the lemon and orange
                                                                                     - 1tsp ground ginger
                                                                                     - 1tsp grated nutmeg

You'll need yourself a 26cm-deep pie dish (or thereabouts), and some cold hands to work with the pastry - though that last one's probably not going to be hard to ensure at the moment (brrrrr)!

What to do:
Pastry
1. Sieve the flour, salt and sugar into a bowl, then rub in the butter using the tips of your fingers.
2. Using a round-bladed knife, stir in enough of the water to bind the mixture into a dough.
3. Wrap the dough in clingfilm, and chill in the fridge for at least 20 minutes while you make the filling/pour yourself a glass of wine or suchlike.
4. Roll out the dough on a lightly floured surface into a circle 3cm larger than your dish. If you don't have a rolling pin, use a wine bottle, Genius or what?!
5. Use your rolling pin (/wine bottle) to transfer the pastry to the dish, then press the pastry into the base. Trim off any excess pastry using a sharp knife and put aside. Put the dish  into the fridge to chill.

 
6. You can either clingfilm the excess pastry and fridge it to make jam tarts later, or you can get fancy and use it to make a lattice top. If the former, skip to the filling bit below, but if the latter, keep reading folks.
7. Roll out the excess pastry so it's slightly larger than the pie dish, then cut it into strips of about 2cm each. You should end up with 12-14.
8. Cut a sheet of greaseproof paper larger than the dish, and place one of the strips onto the middle of it. Take another and lay it perpendicular to the first, so it lies across the top. Place another in the same direction as the first strip (leaving a gap the same size as the strip itself), between it and the first, and tucking it underneath the second strip. Continue like this until you have a full lattice and each of the strips are used.


Filling
1. This is super simple. Gently heat the golden syrup and treacle in a pan until runny, then remove from the heat and stir in the breadcrumbs, zest, juice and spices.
2. Leave to stand for 10 minutes. If the mixture seems loose then stir in more crumbs, or if it's too stiff then add more syrup until you're happy with the consistency.
3. Spoon the filling into the pastry case, taking care not to compact the mixture.
4. If you've made a lattice top, slide your hand underneath the greaseproof paper and lift it. Bring it close to the tart, and then flip it in one swift motion. Remove the paper and trim the edges of the lattice, then brush with a beaten egg.

 
5. Bake for about 30 minutes at 190°C, until the pastry is golden. And then enjoy thoroughly - with cream/custard/ice-cream if convenient. If inconvenient, do it anyway.


Wednesday, 21 November 2012

Pear and Blackberry Bread & Butter Pudding


Late as ever, but here's this month's food column in my university newspaper. Pretty proud of this one - I went home for a few days in reading week and made it for my Mum and her new boyfriend, which should give you an idea of the awesome.

More actual posts to come soon, promise.

It's less saturated in real life, I just wanted it to show up...

Sunday, 14 October 2012

And then I made vegetarian French onion soup and gluten free bread because I'm the best housemate ever.

Me again. Zosia's alive and cooking (see what I did there?), honest, but she's currently in Cheshire for Alex's Dad's wedding and is running around like a running-around-person being busy. Also her blogger may be broken. I'm not entirely sure but she promises to sort it all when she has time.

In the meantime, I'm doing more cooking than ever and loving it. And I'm particularly proud of this recipe.


As I mentioned last month in my apple pie post, Fraser took me to Paris in September. Cue being surrounded by endless beautiful food, but also feeling sad because I can't eat it. Being vegetarian sucks in France. I ended up having French onion soup a couple of times - anxiously asking the waiters if it was vegetarian, and being assured that it was - but I'm not sure I'm convinced. Ever since I discovered that the onion soup in a cafe at home was made with beef stock, I'm permanently suspicious. So, I decided that the only way to avoid this conflict and still get the yum-factor was to make my own.

Ingredients (serves 4):
- 50g butter
- 6 onions
- 4 cloves garlic
- 1/2 tsp salt
- 1/2 tsp caster sugar
- 3tbsp plain flour
- 1/2 cup white wine (approx 120ml)
- 1500ml veg stock
- 1tsp smooth French mustard
- approx 200g cheese - jarlsberg or gruyère (or a strong cheddar if you have none)

1. Begin by heating some olive oil in a large pot and then melting the butter. Chop the onions into strips, crush the garlic and add along with the salt.

2. Using a low-medium heat, these now need about 50 minutes to caramelise - thought you need to add the sugar after the first 15. Stir every 10 minutes or so, just to make sure everything gets an even blast at the heat and that nothing sticks to the bottom of the pot and burns.


3. When the onions are soft and golden and you just can't stand waiting any longer, add the flour. Stir to coat and cook for about three minutes before adding the wine. Let this bubble, and use it to get all the bits off the bottom of the pot that got there stuck no matter how much you stirred (the chefs call this 'deglazing the pan').

4. Add the vegetable stock and mustard, and cook with the lid on for a further 40-50 minutes, stirring every 15 minutes or so. Season to taste.

And as for the bread... 

This was the first time I'd made gluten-free bread, so I thought I'd keep it simple and follow the recipe on the back of the Dove's Farm gluten-free bread flour packet. It wasn't bad. And it probably would have worked better if we'd discovered at that point that the oven in our new house is a fan oven and so all the cooking times need to be altered. Also we don't have a bread tin so it was freestyle...

Don't judge me.

Despite its aesthetically-questionable appearance, it worked really well with the soup. Mix it all up before you start, then let it rise while the onions are doing their thing. Whap it in the oven about the time you add the flour and everything should be ready at about the same time.

5. To serve, slice up the bread and stick it under the grill for a couple of minutes until it's going hard. Then grate your cheese (I only had cheddar) and sprinkle over, before putting back under the grill. If you have posh oven-proof soup bowls you can put the bread and cheese in there, but I don't so I used my trusty baking tray and then transferred them. If you have any around then sprinkle with a little herb de provence for a finishing touch, and enjoy.

Wednesday, 20 June 2012

Flatbreads and Bean Dip

My madre always complains that I don't eat enough beans. 
 
At the beginning of the year I turned up at uni with thousands of cans of beans and chickpeas and things and when it came to it, I think I used about two of them. Maybe she's right but I'm not usually a bean fan. 

BUT when it came to the end of term, I was using up whatever was around. And that just happened to be beans.

These flatbreads were super easy to make and delicious with bean dip.

AND here's how you do it:

For the flatbreads:
1 cup of flour (I used Dove's Farm gluten free bread flour but this will work with ordinary flour too)
1/2 a teaspoon of yeast powder
1/4 of a teaspoon of sugar,
1/4 of a teaspoon of salt
1/3 of a cup of warm water (add more water if the dough gets too stiff and more flour if it gets too sticky)

1. Mix together the flour, yeast, sugar and salt.
2. Gradually add the warm water, mixing with a wooden spoon. 
3. Knead the dough about ten times. 
4. Form into eight balls. Flatten each with a rolling pin.
5. Heat up a frying pan. You don't need to use oil or butter.
6. Dry fry the flatbread for about 2 minutes on each side, or until it looks done.

For the bean dip:

400g can of butter beans
3 cloves of garlic
a splash of lemon juice
2 tablespoons of olive oil
lots of mint leaves
salt and pepper to taste

1. Drain the butter beans.
2. Chop and crush the garlic. Add to the butter beans along with the olive oil and lemon juice.
3. Blend this all together into a paste with a blender.
4. Chop the mint leaves. Stir them into the dip along with salt and pepper. Serve with the flatbreads.