Sunday 27 January 2013

Afternoon Tea and Cupcakes

This refers back to December when we had afternoon tea of baked goats cheese with a festive salad to accompany, and lots of tea and cake. These are the cakes.
 

They're lemon and blueberry cupcakes, and are basically massive cheer-up cakes because they make you happy when you eat them. All of us had been struggling with work overload, so there was a need for something to make life that bit sweeter. It worked.


Ingredients:
- 6oz caster sugar
- 6oz butter
- 3 eggs
- 8oz gluten-free, self-raising flour
- 1/2 tsp baking powder
- 6oz blueberries
- zest 2 lemons
- juice one lemon

For the syrup:
- juice ½ lemon
- 2 tsp sugar

To decorate:
- more blueberries
- zest 1 lemon
- juice ½ lemon
- small mint leaves
- icing sugar


1. Beat together the butter and sugar until soft and creamy. My mum always says do it until you think it's ready, then do it some more, and this attitude is yet to fail me.

2. Add the eggs and incorporate into the mixture. Then sieve in the flour and baking powder, and fold it in carefully - using a metal spoon if possible.

3. Add the blueberries and lemon juice and zest, and stir carefully so everything gets properly mixed up. Stir this as little as possible, as you don't want to knock out the air you've worked into the cake.

4. Bake at 180°C in a preheated oven for 15-18 minutes, until they're golden and a cocktail stick inserted into the middle comes out clean.

5. While they're still warm, grab a small pan and mix together the ingredients for the syrup over a low heat. Using a cocktail stick, poke holes into the cakes and then drizzle the syrup over the top. Now let it all cool down and go drink a cup of tea.

6. Once it's all cooled, mix up some icing sugar with the lemon juice in a bowl. Dip the blueberries in, then use the icing to stick them onto the cakes. Stick a mint leaf in between them (looks awesome and gives a really refreshing taste), then grate over some lemon zest and finally dust over a sprinkle of icing sugar. Voila. Who needs to go somewhere fancy to eat fancy food?


Monday 21 January 2013

A Post-Snow Warm Up

As is the case for most of the country at the moment, over here we're covered with a blanket of beautiful snow. There have been snowball fights, snow angels and even a snow rabbit, and at the end of the day you need something warm and comforting to come back to - that preferably doesn't require a lot of effort. Enter bread and stew.

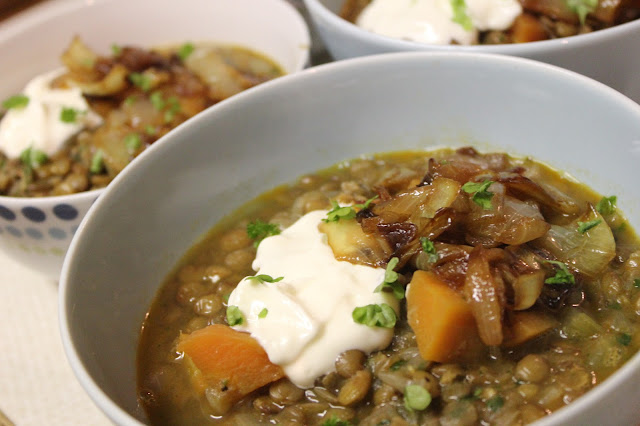
I always think of stew as being a bit bland and mushy, and generally not the most appealing. I don't know why because I've never really had it, but this blows the generic 'stew' idea out of the water. It's a take on one by Nigel Slater, and is full of spices and textures and goodness. And as for bread, I've adapted a family recipe to make gluten-free bread rolls. So. Much. Good.


Stew - mine's basically the same as Nigel Slater's recipe, but a vegetarian version with a few extra bits
Ingredients:
- 4 medium onions
- 3 small carrots
- 1 large stick celery
- 1 clove garlic
- ½ tsp mild paprika (you could also use smoked)
- ½ tsp cinnamon
- ½ nutmeg, grated
- 300g Puy lentils (green work fine as a substitute)
- 500ml veg stock
- large handful fresh parsley
- 1tsp sugar
- couple of knobs of butter
- crème fraîche (to serve)

1. Melt a knob of butter in a large pot or saucepan. Roughly chop two of the onions, along with the celery, carrots and garlic, and add to the pan. Cover and let steam for a few minutes, before adding the spices. Stir to coat and cook for a few more minutes. 
2. Add the lentils, stock and 500ml of water. Cover and leave for 30 minutes - stirring occasionally - until the lentils are all soft and nice. 
3. While that's cooking, stick another knob of butter in a small pan. Chop the two remaining onions into fairly large pieces, then add along with the sugar. Allow these to cook slowly and caramelise, and then finish with a grate of nutmeg. 
4. Add your handful of chopped parsley to the lentils along with some salt and pepper, then serve with the onions and a dollop of crème fraîche.


Gluten-free bread rolls - my Mum calls these 'milk rolls' for reasons which will soon become apparent. The gluten-free version makes 8-10 rolls, but you tend to get more out of the regular version.
Ingredients:
- 300ml milk
- 50g butter
- 7g sachet dried yeast
- 1tsp caster sugar
- 500g gluten-free plain flour
- 1tsp salt
- 1 small egg, beaten

1. Place the milk and butter in a pan and heat until lukewarm.
2. Sieve the dey ingredients into a bowl and mix together. Make a well in the centre and pour in the liquid along with the egg. Mix to a soft dough, then spend a few minutes attempting to knead some air in. If you're making the regular gluten version knead well until smooth and elastic.
3. Cover with a damp cloth and leave to rise in a warm place for 30 mins, until increased in size.
4. Turn onto a well-floured surface and have another attempt at kneading for a few minutes. Cut into pieces and shape into rolls.
5. Place on a greased baking sheet, cover and leave in a warm place for another 10-15 minutes. Grab another egg and beat it with a splash of milk, then use this to glaze the rolls. Sprinkle with various seeds to make them all pretty, then bake in a preheated oven at 220°C for 20 minutes.

Voila. I know the snow is causing a lot of disruption and all, but I kind of hope it stays a bit longer. 
Days like these are the best.


Friday 18 January 2013

Honey and Raspberry Cake: Guest Post by Lucy Allman


Hello there! I’m Lucy Allman, a uni friend of Bryony’s and an avid reader of this blog. This year I am doing an assistantship abroad in Pompei, which not only offers up many new and exciting ingredients to work with, but also means I have to manage without things like vanilla pods and actual cream that comes from cows. As it is, I’ve taken to inventing more recipes rather than hunting them down online and then finding that I’m missing a crucial ingredient that isn’t available here. 

I am really excited to be doing a guest post here, and hope that you find my honey and raspberry cake to be a recipe worth trying out! It’s a variation on a classic Devonshire honey cake, and while you will need to set a few hours aside in order to make it, the end result is fruity, moist and very, very moreish…

Honey and Raspberry Cake
You will need:
- 250g clear honey, plus about 2tbsp extra to make the glaze
- 225g unsalted butter, cut into cubes (luckily for me, all Italian butter is unsalted, but most English supermarkets have it too)
- 100g brown sugar (any kind is fine; I used Demerara, but muscovado works just as well)
- 3 large eggs, beaten
- 300g self-raising flour
- 125g raspberries
- 85g caster sugar

Preheat your oven to 140°C for fan, 160°C for conventional, or gas mark 3. Grease and line a 20cm/8 inch cake tin.
Please ignore my dirty stove!

Place the honey, butter and sugar in a pan and melt them together over a low heat, stirring occasionally. Once it turns into a delicious syrupy liquid, add about 10-12 raspberries and mix them in until they start to break down (it helps if you squish them against the sides of the pan with a spoon). Bring the mixture to the boil for one minute, and it will froth up like marshmallow fluff and then turn a gorgeous deep pink colour (this is my favourite part).


It is very important that you now let the mixture cool for about 15-20 minutes, so the eggs don't cook when you mix them in (top tip: with the weather as cols as it is - yes, even in Italy! - you can go outside with your pan or place it next to an open window to speed up the process.

While the mixture is cooling, sieve the flour into a mixing bowl. Then, feel free to do a dance or eat a sandwich while you're waiting.

Once the mixture is completely cool (or, you know, cool enough that you won't end up with raspberry-flavoured scrambled eggs), add the eggs and beat them in gently. Tip the mixture into the bowl with the flour and stir it all together. You batter will be quite runny; don't worry, that's normal.

Pour the batter into the prepared cake tin and bake for 50 mins-1 hour (top tip: utilise the cooking time to get the washing-up done, and then you won't have to worry about it later) until the cake is well-risen and golden brown. If you're worried that the top is becoming too brown, cover the cake with some tinfoil.

Check to see if it's cooked through with a skewer - poke it in the middle of the cake, and if it comes out clean then your cake is ready. Alternatively, you can poke it with your fingertip and see if it springs back completely, in which case you're good to go. For best results and to be absolutely sure, I like to do both.

Once the cake is cooked, leave it to cool for a little while and make the glaze. Warm the remaining raspberries in a pan with 2tbsp of honey, a little bit of water and the caster sugar. Bring it to the boil, then strain it through a sieve.

Turn the cake out onto a plate and prick it all over with a skewer or a fork, then drizzle the raspberry syrup over the top.

I like that my camera managed to capture the steam - I feel it adds a certain something.


This cake can be served while still warm, with a generous dollop of custard, or you can just cut a big slice and enjoy the sticky goodness.


Wednesday 16 January 2013

The Best Treacle Tart Ever.

This year on New Year's Eve life was a bit different. My birthday's on January 1st so usually NYE is birthday party time, but I did NOT want to be 20 and so kept it on the ultra-low this time. Instead Fraser came over on my birthday, and for New Year's Eve Mum's boyfriend came for dinner and Mum and I did uber cooking. 
And I made this:


It has been the work of years, and started off as a recipe by Linda Collister in The Great British Book of Baking. And I'm pretty darn proud of it if I do say so myself.

Ingredients:
Pastry                                                                           Filling
- 220g plain flour                                                           - 9 rounded tbsp golden syrup
- pinch of salt                                                               - 3 rounded tbsp treacle
- 1tsp caster sugar                                                        - 150g white breadcrumbs
- 160g unsalted butter, chilled and diced                     - zest of 1 lemon and 1 orange
- 2-3tbsp ice-cold water                                               - juice of half of each the lemon and orange
                                                                                     - 1tsp ground ginger
                                                                                     - 1tsp grated nutmeg

You'll need yourself a 26cm-deep pie dish (or thereabouts), and some cold hands to work with the pastry - though that last one's probably not going to be hard to ensure at the moment (brrrrr)!

What to do:
Pastry
1. Sieve the flour, salt and sugar into a bowl, then rub in the butter using the tips of your fingers.
2. Using a round-bladed knife, stir in enough of the water to bind the mixture into a dough.
3. Wrap the dough in clingfilm, and chill in the fridge for at least 20 minutes while you make the filling/pour yourself a glass of wine or suchlike.
4. Roll out the dough on a lightly floured surface into a circle 3cm larger than your dish. If you don't have a rolling pin, use a wine bottle, Genius or what?!
5. Use your rolling pin (/wine bottle) to transfer the pastry to the dish, then press the pastry into the base. Trim off any excess pastry using a sharp knife and put aside. Put the dish  into the fridge to chill.

 
6. You can either clingfilm the excess pastry and fridge it to make jam tarts later, or you can get fancy and use it to make a lattice top. If the former, skip to the filling bit below, but if the latter, keep reading folks.
7. Roll out the excess pastry so it's slightly larger than the pie dish, then cut it into strips of about 2cm each. You should end up with 12-14.
8. Cut a sheet of greaseproof paper larger than the dish, and place one of the strips onto the middle of it. Take another and lay it perpendicular to the first, so it lies across the top. Place another in the same direction as the first strip (leaving a gap the same size as the strip itself), between it and the first, and tucking it underneath the second strip. Continue like this until you have a full lattice and each of the strips are used.


Filling
1. This is super simple. Gently heat the golden syrup and treacle in a pan until runny, then remove from the heat and stir in the breadcrumbs, zest, juice and spices.
2. Leave to stand for 10 minutes. If the mixture seems loose then stir in more crumbs, or if it's too stiff then add more syrup until you're happy with the consistency.
3. Spoon the filling into the pastry case, taking care not to compact the mixture.
4. If you've made a lattice top, slide your hand underneath the greaseproof paper and lift it. Bring it close to the tart, and then flip it in one swift motion. Remove the paper and trim the edges of the lattice, then brush with a beaten egg.

 
5. Bake for about 30 minutes at 190°C, until the pastry is golden. And then enjoy thoroughly - with cream/custard/ice-cream if convenient. If inconvenient, do it anyway.


Chocolate-Orange Biscuit Bites: Guest Post by Jamie-Rose Duke

Hello all, this is Bryony and Zosia's friend Jamie-Rose Duke tip-tapping away here - hoping I can do their ace blog justice! 

If there's one thing I've learned throughout my near twenty years, it's that there's never a bad time to bake biscuits. Free fact of the day for you there. And over the Christmas holidays, not having had the comforts of my kitchen at home for three and a half months, I was keen to get my baking groove on. Now, as a bear of little brain and simple pleasures, such as myself, it didn't take me long to decide my main two ingredients: Chocolate (or cocoa, to be precise) and alcohol (or Cointreau, to be even more precise)

And you know what?

My chocolate-orange, crumbly biscuit bites turned out pretty damn well. And they're super easy to make!

You will need:

250 grams of soft butter
150 grams of caster sugar (although, light brown works just as well)
40 grams of cocoa powder
300 grams of plain flour
1/2 tsp. of bicarbonate of soda
1 tsp. of baking powder
The zest of 2 small oranges (or one large one) - be thorough with the zesting!
1 1/2 - 2 cap-fuls of Cointreau triple sec.

1. Make sure your oven is pre-heated to 170°C/ gas mark 3 (or around 150°C if you have a fan oven).

2. Cream the butter and sugar in a bowl until it's soft and smooth (no lumps of butter still visible!).

3. Next, add the cocoa and once that's mixed in, the flour, bicard and baking powder - remembering to sieve it all first!

4. Add the orange zest, mix in, and then the two caps of Cointreau (if you're not keen on adding the alcohol, then just adding the juice of the orange(s) is just as wonderful - I'm just quite a fan of triple sec!).

The first two photos on this guest post were taken by the beautiful Miss Bryony Bowie herself :)
5. When the mixture is complete, it's time to roll it into balls and stick them well spaced on baking trays lined with parchment. The balls should be about the size of a walnut and you should be able to make anything from 24-30, all depending on the size you think walnuts are.


6. Before popping them in the oven, gently pat down each biscuit-to-be so they're about a centimetre and a half thick. (I like to gently imprint a fork on the top, just to be fancy) And when that's done, bung the trays into the oven for about 15 minutes - again, you can judge this time for yourself depending on how ferocious your oven is. 

7. When they come out, don't be surprised if they don't look quite done, they'll continue to cook as they cool - which you should let them do on a wire rack, when they're cool enough for you to remove from the baking tray.

8. ENJOY THE BISCUITY GOODNESS. 


This recipe is inspired by one of Nigella Lawson's. Just with a few added bits and bobs :)

Thursday 10 January 2013

New for 2013: Guest Posts

We thought this year we'd try something new - guest posts. Loads of our friends are great at cooking/baking and obviously also experiencing student cooking/life, plus everyone has their own ways of doing things. All things told it seemed a good idea to let people have their own say! 

You'll notice 'guest post' now listed in the contributer list - there's an email address on the profile, so if you're interested in writing for us do email in! 

Our first writer will be Jamie Rose Duke, hopefully in the next week.

Get emailing, people!

Sunday 6 January 2013

It's Been a While...

Because life has been insane. 
Since I got elected Communications Officer at the SU life has been manic, and with uni work, getting ill and general life being crazy I had to give up a few things to make things work. Watching Downton Abbey and writing this blog were just two of them, and I sincerely apologise. (Mainly to Bryony. Bryony I'm sorry...)

BUT HEY, HERE'S A GINGERBREAD HOUSE TO MAKE UP FOR IT.


Every year for the last four years I've made a gingerbread house. It started off back in 2009 because I was ill and needed things to do and I've never really been a fan of christmas so I figured I'd make a gingerbread house to give me something to look forward to.

House of 2009
House of 2010
House of 2011


Since then, this epic undertaking has significantly upped the stress levels of cooking for christmas, with structural collapses and smartie shortages really taking a toll on my nerves every year. But it's entirely worth it, just because I'm a show off like that.

I always use this recipe from BBC Good Food. The gingerbread is amazing but the template is a bit small, so I usually print it off bigger so that the largest piece fills a whole side of A4.

In 2011 I attempted a gluten free gingerbread house. It did not go well. I ended up building a giant wall of shortbread to support the inside walls because the walls kept collapsing and it was awful. This year I did it with half wheat flour and half gluten free, for sanity's sake... I also made some structural supports for the inside that made the whole thing hold together like a dream.
The shortbread wall of 2011
The nice, neat structural supports of 2012
My main tip when it comes to making a structurally sound gingerbread house is to make the gingerbread nice and thin. This may sound counter intuitive - you want it to be sturdy and thick right? But actually, the thinner the gingerbread the drier it bakes in the oven, and the less moisture it absorbs over time. This makes it all much more stable and less likely to collapse, trust me on that one... The recipe suggests rolling it out to the thickness of a pound coin and this seems about right to me.


 Decorations? I highly recommend Smarties. Theyre awesome for gingerbread houses. Also Cadbury's chocolate fingers, because they look almost like logs on a log cabin, and my mother loves Terry's chocolate orange and they usually make a good apex for the roof. I used Malteasers on the back and chocolate buttons around the house as a sort of garden.

So there you have it. Gingerbread houses are not impossible. They're not easy but the finished product is entirely worth the trouble it takes to get it all together, so next year you should definitely have a go.