Showing posts with label spinach. Show all posts

Thursday, 8 August 2013

An Indian Feast


Before the end of term I decided I wanted to do a proper big dinner for a few of us, because I like cooking and I like people. Zosia had an 'Indian dip selection' in the fridge. That was that, really.

Sooooo I made a mixed bean curry and onion bhajis and chapatis and coriander rice. And it was exhausting. And also wonderful. The curry recipe belongs to a friend of my aunt and has been a favourite at home for years - it went down pretty well here, too! It's a long list of ingredients but don't be daunted: most of them are just store-cupboard spices. Also, because it needs time to marinade it's a good one to make earlier in the day.

Ingredients (serves 4):
- 1tbsp mustard seeds
- 1tbsp cumin seeds
- 1 small onion, finely chopped
- 1 clove garlic, finely chopped
- 2 chillis, chopped
- 1 tin chopped tomatoes
-  ½tsp turmeric
- 1tbsp ground coriander
- 1tbsp ground cumin
- ½pt boiling water
- 4 large tins of beans (I tend to use 2 of chickpeas and 2 of kidney beans)
- 3 balls of frozen spinach
- handful fresh coriander

Method:
1. Grab your biggest saucepan and drizzle in some olive oil. Add the cumin and mustard seeds and heat until they start popping.
2. Add the onion, garlic and chilli and soften 'til the onion becomes clear (about 8 minutes).


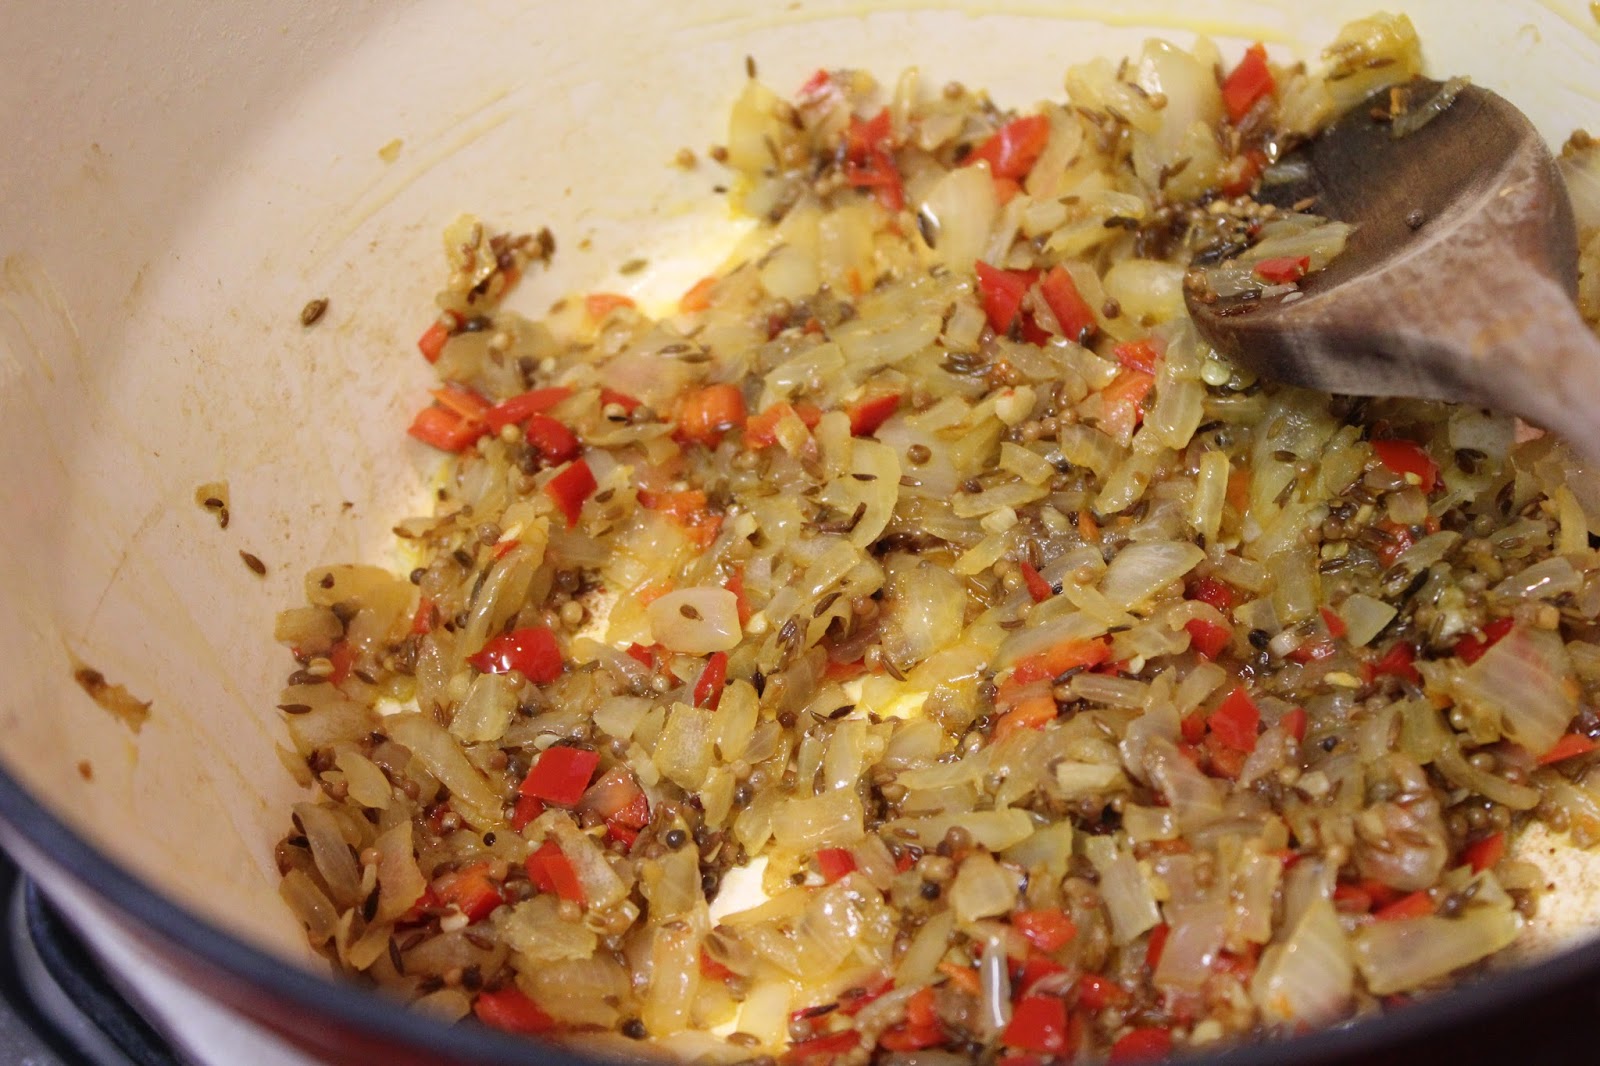
3. Add the chopped tomatoes and spices and cook for a few more minutes, then add the water.
4. Stir well, then put on a lid (or some tin foil) and simmer on a low heat for 30-40 minutes.
5. Add the beans and spinach and stir until the spinach has de-frosted, then allow to cool and marinade for as long as you have time for.
6. Cook through when required, then season and add the fresh coriander.


Simple. For the rice, I cooked some basic brown rice and then added a squeeze of lime juice, some salt and pepper and some fresh coriander to liven it up a bit.

The onion bhajis I made were a very yummy side, and seemed to work fine with gluten free flour.

And it's easy to make chapatis. You need a tablespoon of both wholemeal and white flour per person (OR you can buy chapati flour and use 2tbsp per person. All the flour in our house at uni is gluten free, so it was actually cheaper for me to do this). Add a drizzle of olive oil and enough warm water to bring it all together in a dough, then knead for a couple of minutes. Cover with clingfilm, and then leave for an hour. 

Divide the dough into pieces (4 each, so it depends how many you're making for): they'll look small, but it's all good. Roll out as thin as you can without breaking them, then grab a frying pan and and cook the chapatis one at a time, for about a minute each side (you don't need any oil). Once cooked, transfer to a plate and spread with butter, then onto the next!

Serve up to your hungry friends and enjoy your feast.


Thursday, 27 June 2013

Proper Gluten Free Pasta

Firstly, apologies for the lack of posting this month! General end of term stress combined with moving out of this year's house (and, in my case, carting my possessions 300 miles up the country) has left us fairly exhausted. But this one's awesome enough to make up for it - I promise.

Since watching it done on Masterchef and countless other BBC food programmes, I've wanted to make my own pasta. At some point Zosia happened to mention missing ravioli since having to cut out gluten, and that was that. GLUTEN FREE RAVIOLI.


And you know what? It wasn't difficult. I didn't have a pasta-maker. And it was the best gluten free recipe I've ever made. Usually gluten free baking makes everything sort of crumbly, but this was properly elastic and smooth and lovely and I was so pleased. It was based on this recipe and took a little bit of time (and some extra man-power with the rolling out - thanks Harry!), but I'll definitely be making it again.

Ingredients (serves 4):
- 300g gluten free plain flour
- 1tbsp xantham gum
- 1tsp salt
- 5 eggs
- 1½tbsp olive oil

Method:
1. Mix together all the dry ingredients, then add the eggs and oil and mix until it stops resembling breadcrumbs and starts to come together (ideally, this would be done in a food processor).
2. Remove from the food processor, if using, and knead for a few minutes until a smooth ball has formed.
3. Wrap in clingfilm and put in the fridge for 15 minutes - or as long as you need to while you do other things (this is a good time to make your ravioli filling).
4. Remove from the fridge and divide the mixture into four (this makes it MUCH easier to work with), then sprinkle some flour onto your worktop and roll out one of the pieces of dough to about half a centimetre. Then, fold the dough 4 or 5 times and roll out again. Repeat this about 6-7 times, or until your arms give up!
5. Roll out your dough as thin as you can get it. Then, for ravioli, use a biscuit cutter (or a glass) to cut shapes.
6. Beat another egg in a bowl with a splash of milk (you can just use milk if you're all out of eggs). Take one pasta shape and put a teaspoon of your ravioli filling into the middle (I made a spinach and ricotta filling - half the amounts there served three of us, so adjust to what you need). Brush around the edges with a little of the beaten egg, then grab another shape and stick down firmly. If it's not properly stuck it'll burst in the pan, so get pressing!


7. Repeat the whole thing with the rest of the dough (I told you it was a bit time consuming).
8. Bring a big pan of salted water to the boil and drizzle in some olive oil. Carefully drop in the pasta and cook for 4-5 minutes (the cooking time depends on the thickness of the pasta: if it was tagliatelle or something without a filling it would be more like 3-4 minutes). The best way to take it out and make sure it doesn't break is to use a slotted spoon, though don't worry if you don't have one.


9. Serve up with a good sauce. I made this because it's one of my favourites, and it was great. Like, REALLY great. Go make it.


Wednesday, 6 March 2013

Actual Cannelloni

Got people coming over that you want to impress a bit? Then this is the one for you. It's named so to differentiate from my Aubergine Not-Cannelloni in October, and is a slightly longer post than normal because there are a few different bits to it, but I promise you it's worth it!

The only time I'd ever really had cannelloni was for school dinners (it was the best thing they did!), but generally speaking I was suspicious of it. Maybe because I couldn't see inside them, or maybe because I used to have a prejudice against spinach - I'm not sure, but I do know that all that changed when Fraser took me to Jamie's Italian for Valentine's last month. I had the 'Honeycomb Cannelloni 3 Ways', and it was like I'd stumbled across a whole new world of food. Last week we had people over for dinner, so I thought I'd get creative and see what I could do. This was the result.


I decided it was a bit much to try and have three different fillings, but I did do two - one was a spinach and ricotta, and the other was a butternut squash and sage. And they were pretty epic if I do say so myself.

Ingredients: (serves 6)
Spinach and Ricotta                                                         Butternut Squash
- 1 clove garlic                                                                 - 1 large squash
- large knob of butter                                                      - 1 onion   
- ¼ grated nutmeg                                                           - 1 clove garlic   
- 1tsp dried oregano                                                        - 2tbsp cream 
- 200g bag spinach                                                           - ¼ tsp grated nutmeg
- 250g pot ricotta cheese                                                - 1tbsp chopped sage leaves   

Tomato Sauce                                                                   Assembly/Topping
- 1 onion                                                                          - approx. 18 cannelloni tubes
- 1 clove garlic                                                                  - 200ml crème fraîche  
- 1 tin chopped tomatoes                                                - 100g freshly grated parmesan   
- 400ml water                                                                     
- 1 oxo cube                                                                       
- half jar of sun-dried tomatoes                                            
- handful chopped sage leaves                                           

I know it looks like a scarily long list of ingredients, but I promise if you look closely it's not as scary as you think. The majority of things are store-cupboard ingredients that even if you don't have, you can bet someone else in your flat will!
Method:
Butternut Squash
1. Start on this one first because it takes the longest, and can be cooking while you do other things. Peel and chop your squash into cubes - about the size of the last joint on your little finger if you can bear it, as the smaller they are the faster they'll cook. 
2. Melt the butter in a pan, then add the onion and garlic and cook for five minutes until softened.  
3. Add the cubes of squash and cook for about 30 minutes - adding the sage and nutmeg along with some seasoning after 20 minutes.  
4. Take off the heat and let cool a little, before adding the cream and mashing.

Spinach and Ricotta
1. Melt the butter in a fairly large saucepan, then add the garlic, nutmeg and oregano and cook for a couple of minutes until the garlic is soft.
2. Wash the spinach and add in a bit at a time - it shrinks down to almost nothing so I guarantee you'll need more than you think. Make sure you keep turning the spinach too, to make sure what's on the bottom doesn't burn and it's all cooked nicely.
3. After a few minutes, transfer the spinach to a bowl and let it cool down. DON'T throw away all the lovely liquid in the pan - it'll form the basis for the tomato sauce.

4. When the spinach is cool, squeeze out any excess liquid (don't throw away) and chop finely. Put it back in the bowl with the liquid, season, then mix with the ricotta.

Tomato Sauce
1. Grab the pan you cooked the spinach in, with the liquid still in the bottom, and add to it the onion and garlic. Cook for about 8 minutes until soft and starting to colour.
2. Chop up the sundried tomatoes and add those to the pan. You don't have to use them, but it gives such a beautiful intense flavour if you do! Cook for another 2 minutes.
3. Add the chopped tomatoes, water and oxo cube, and bring to a simmer. Cook until it's reduced by about a third, then add the sage leaves and season, and pour into the bottom of the dish you're baking your cannelloni in.

Assembly
1. Grab yourself two plastic sandwich bags, and fill with the mixtures for the filling. Twist around the top to keep it secure and cut a small hole in the tip: you now have a make-shift piping bag.
2. Use the piping bags to fill the cannelloni tubes. You can do half of them with one filling and half with the other, or mix it up - completely up to you.
3. Lay the tubes on top of the tomato sauce in the dish you're baking them in.

 4. Spoon the crème fraîche over the top and sprinkle over the parmesan, then bake at 180°C for about 30 minutes - until golden and bubbling. Serve with garlic bread.
  
Gluten Free: Either grab yourself some gluten-free lasagna sheets and use them to make your own cannelloni pasta, or just cook some penne and mix the fillings together with the tomato sauce to make a pasta bake. Top the same as the non-gluten-free version and bake for 5-10 minutes less.

The gluten free pasta bake version

Voila! It looks like a lot of work, but I promise you it isn't really - especially if you buy the cannelloni tubes you don't need to cook first, like I did. Please do leave any questions/results of your own in the comments, and good luck!


Sunday, 2 December 2012

The Culinary Christmas Spirit

Around this time last year, my dad took me to a gastro-pub-type-place in East Dulwich called The Palmerston to celebrate the end of term and get into the general Christmas spirit. We had a great time, and culinary-wise I tried a whole bunch of things I'd never had before.

This weekend, Jamie and I decided that we'd organise afternoon tea as a break from the ridiculous amount of work we both have at the moment, and I decided to recreate/adapt the starter I'd had and loved so much at the Palmerston last year. The result was pretty darn good.


The original was a breaded goats' cheese served with chicory leaves, chestnuts, pomegranate seeds and cranberry sauce. My version used walnut kernels instead of chestnuts (not in the picture because I forgot about them 'til we'd already started eating) and a mixture of spinach and pea shoots instead of chicory (as chicory was not to be found in all of Egham/Englefield Green). And it was awesome, as well as being incredibly easy to make with not much actual cooking involved.

Ingredients:
- a pot of soft goats' cheese each. I think the original probably used rounds, but actually I thought this was a more airy, less stodgy way of doing it.
- 1 egg
- white breadcrumbs
- few sprigs fresh thyme (dried would do)
- black pepper

1. Preheat the oven to 180°C and oil a baking tray.
2. Strip the thyme leaves from the stalks, then mix together with the breadcrumbs and pepper in a bowl. In a separate bowl, beat the egg.
3. Using your hands, mould the goats' cheese into flat cylinders. Dip it in the beaten egg, then into the breadcrumbs so the cheese is coated.
4. Place on the baking tray and stick it in the preheated oven for about 15 minutes, until the breadcrumbs are golden.

Serving (in case you're as persnickety as me):
1. Grab a teaspoon of cranberry sauce and dollop it on the opposite side of the plate, then use the back of the teaspoon to drag it into a cool curvy line.
2. Wash the spinach and place on the opposite side of the plate to the sauce. Half your pomegranate and use the tip of the knife to pick out the seeds, then scatter over the spinach along with the pea shoots and walnut kernels.
3. Whap on the baked goats' cheese and present to hungry guests.


Of course, proper afternoon tea requires cake as well, and not gonna lie - the ones I made were pretty darn good. So watch this space - they'll be following soon.

Tuesday, 30 October 2012

Aubergine Not-Cannelloni

This one's for Rebecca. Because I have loads of other things still to blog and now I'm all out of sequence but I'm doing this one first because she asked me to and I rock.

This one was an awesome one. Inspiration was taken from here, and once I'd seen it the recipes-part of my brain wouldn't stop whirring 'til I'd done something.


You will need (for 4):
- 2 aubergines
- 300g pot garlic and herb Philadelphia
- 125g pot soft goats' cheese
- large handful of fresh spinach
- 1 large onion
- 2 cloves garlic
- 2x 400g tins chopped tomatoes
- sprinkle dried oregano and rosemary
- oxo cube
- glug of red wine (or a desert spoon of red wine vinegar and 1 tsp sugar)
- fresh parsley

The aubergines: Begin by prepping these. They should be topped and tailed, and sliced as thinly as you can get them - about 5mm is ideal. Sprinkle with salt and leave to the side for about 20 minutes, until water droplets begin to appear on the surface. Rinse off the salt and pat dry, then brush both sides of the aubergine with olive oil and grill for approximately 4 minutes each side.

The sauce: Chop the onion and garlic and throw into a large saucepan with a splash of olive oil. Cook for 8 minutes, then add the tomatoes and the dried herbs. When this begins to bubble, put the oxo cube and red wine into the saucepan as well. Cook on a low-medium heat for about 10-15 minutes, stirring regularly, until it begins to thicken. Season to taste.

The filling: Empty the pots of cheese into a mixing bowl, and stir together thoroughly. Add to this a sprinkle of black pepper, some fresh parsley and the spinach leaves (when I made it I had a mixture of spinach, watercress and rocket, so they all went in). Stir again so that everything is incorporated.

The assembly:
1. Put a spoonful of the cheese mixture onto each slice of aubergine, and roll the aubergine around it.


2. Pour enough sauce into a baking dish to cover the bottom of it, then place the aubergine slices on top, with the end of the roll facing down. As you can see with mine I used a courgette as well, as I only had one aubergine. It wasn't bad - I'd recommend sticking to the aubergine but if you have any fussy eaters who don't like it they can be easily appeased this way.


3. Pour the remaining sauce over the aubergine rolls, and bung the remaining cheese mixture on the top too. You could also sprinkle over some breadcrumbs or seeds.


4. Bake at 200°C for 30 minutes and then enjoy thoroughly. I like serving it with a mixed leaf salad with a balsamic and olive oil dressing, but you could do anything at all.