Showing posts with label ginger. Show all posts

Monday, 10 February 2014

Ten Minute Treat: Stir Fry

Much as I love spending hours standing over the stove, gently stirring a risotto, sometimes there just isn't time. This is perfect for a mid-week meal as it's ready to eat in under ten minutes - and is healthy and wonderfully flavoured to boot.


The key to this dish is preparation. None of it takes long to cook at all, so you really do need to make sure you have everything chopped and ready to go before you start to avoid things burning etc.

Ingredients (serves 4):
- 1 red onion
- 2 cloves garlic
- thumb fresh ginger, peeled
- 1 red chilli
- 5 spring onions
- 1 large carrot, peeled
- 1 red pepper
- 100g baby corn
- 100g mangetout
- 160g marinated tofu
- handful beansprouts
- 120g stir fry sauce (pick your flavour - I like the chow mein)
- 2tbsp dark soy sauce
- 1tbsp sesame oil
- juice of ½ a lime
- 300g fine egg noodles (substitute to make vegan/gluten-free)
- sprinkle of sesame seeds

For the mangetout and baby corn I'd recommend just grabbing one of the mixed packs you can get in supermarkets. You can vary the amounts, and can really add any veg you like - mushrooms, water chestnuts or savoy cabbage would all go well - the above is just a list of my favourites/what I had in at the time.

1. Start by putting a pan of water on to boil and thinly slicing all your veg. Put the onion, garlic, ginger, chilli and spring onions together in a bowl to keep them separate from the rest - just because these go in first.
2. Put about 1tbsp olive oil in a wok and heat (think mid to high heat on your hob) - you can test if it's hot by dropping in a slice of veg and seeing if it sizzles. If it does, then go ahead and add the onion mix. Stir this for a minute before adding the carrot, pepper, corn and mangetout and tofu.


3. After another minute add the beansprouts; at this point you should also put your noodles into the pan of boiling water to cook. Make sure you're stirring everything A LOT, or it will just burn.
4. Add the stir fry sauce, soy sauce, sesame oil and lime juice to the wok, along with the drained noodles once cooked (they shouldn't take more than 2 minutes).
5. Serve up and sprinkle with the sesame seeds (and some fresh coriander if you have some to hand). Voila!


Wednesday, 16 January 2013

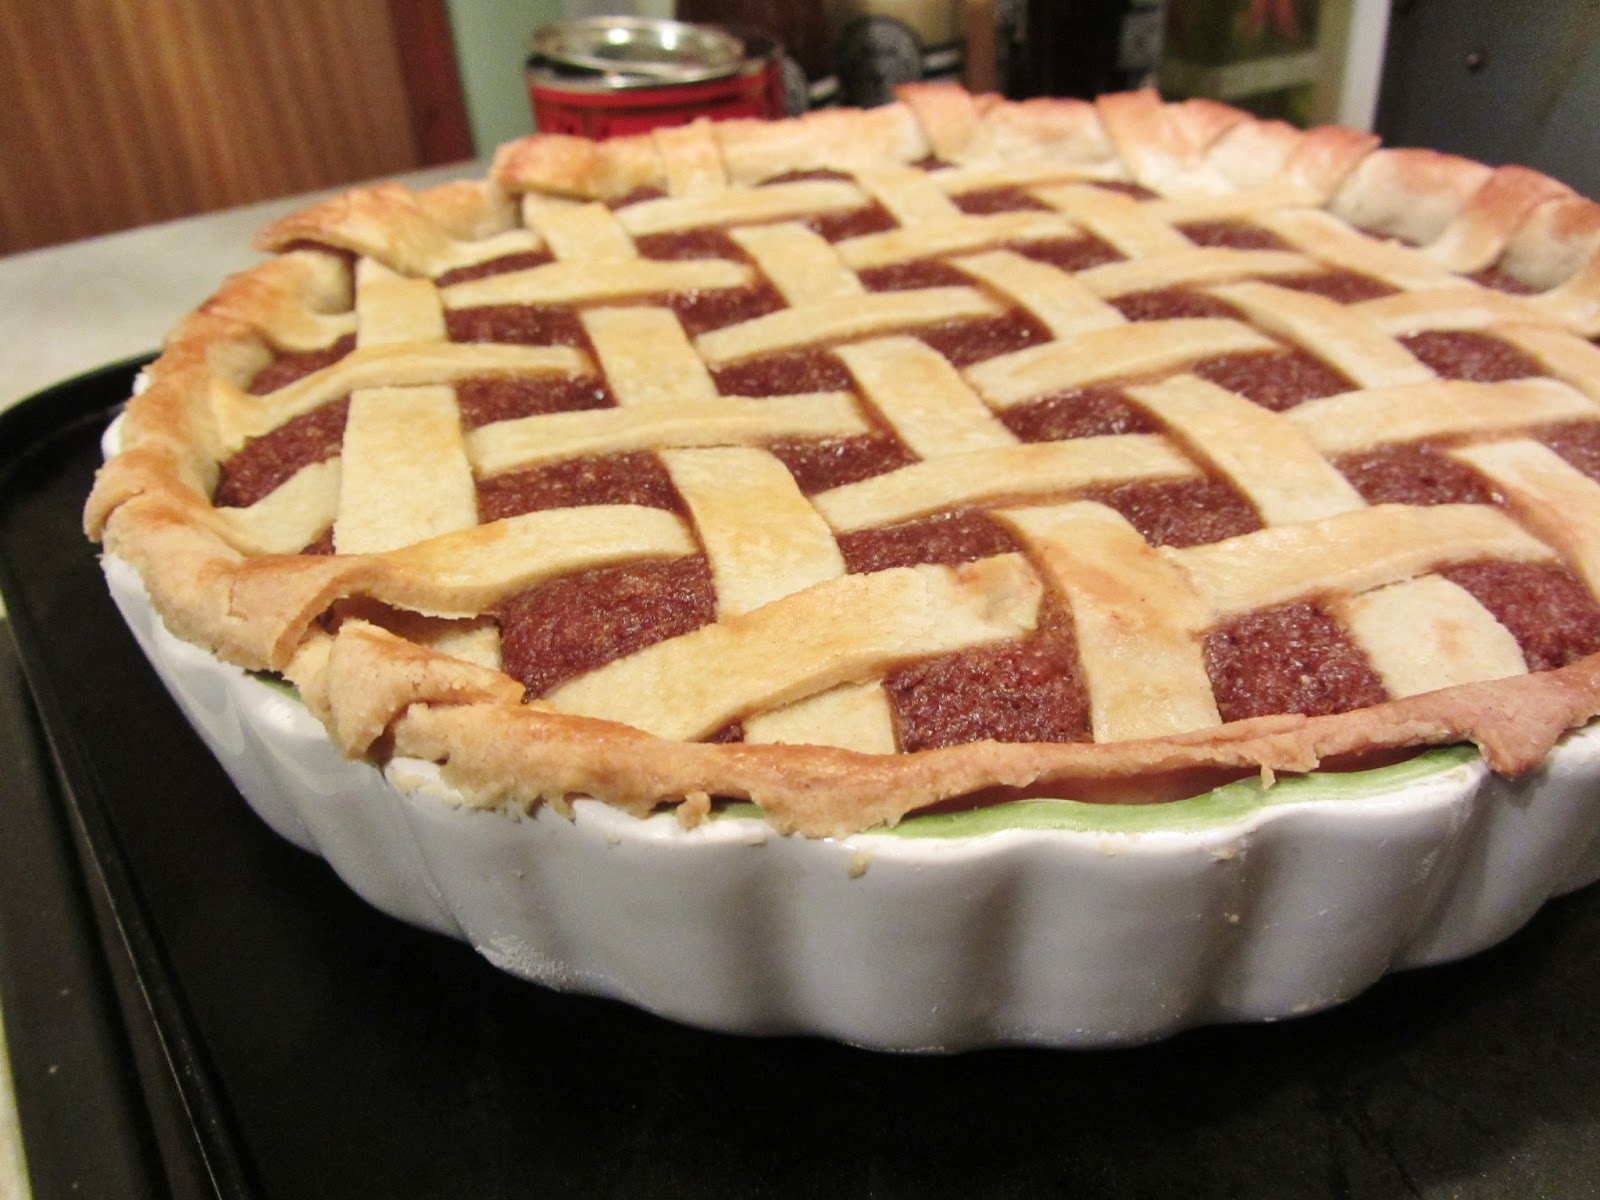
The Best Treacle Tart Ever.

This year on New Year's Eve life was a bit different. My birthday's on January 1st so usually NYE is birthday party time, but I did NOT want to be 20 and so kept it on the ultra-low this time. Instead Fraser came over on my birthday, and for New Year's Eve Mum's boyfriend came for dinner and Mum and I did uber cooking. 
And I made this:


It has been the work of years, and started off as a recipe by Linda Collister in The Great British Book of Baking. And I'm pretty darn proud of it if I do say so myself.

Ingredients:
Pastry                                                                           Filling
- 220g plain flour                                                           - 9 rounded tbsp golden syrup
- pinch of salt                                                               - 3 rounded tbsp treacle
- 1tsp caster sugar                                                        - 150g white breadcrumbs
- 160g unsalted butter, chilled and diced                     - zest of 1 lemon and 1 orange
- 2-3tbsp ice-cold water                                               - juice of half of each the lemon and orange
                                                                                     - 1tsp ground ginger
                                                                                     - 1tsp grated nutmeg

You'll need yourself a 26cm-deep pie dish (or thereabouts), and some cold hands to work with the pastry - though that last one's probably not going to be hard to ensure at the moment (brrrrr)!

What to do:
Pastry
1. Sieve the flour, salt and sugar into a bowl, then rub in the butter using the tips of your fingers.
2. Using a round-bladed knife, stir in enough of the water to bind the mixture into a dough.
3. Wrap the dough in clingfilm, and chill in the fridge for at least 20 minutes while you make the filling/pour yourself a glass of wine or suchlike.
4. Roll out the dough on a lightly floured surface into a circle 3cm larger than your dish. If you don't have a rolling pin, use a wine bottle, Genius or what?!
5. Use your rolling pin (/wine bottle) to transfer the pastry to the dish, then press the pastry into the base. Trim off any excess pastry using a sharp knife and put aside. Put the dish  into the fridge to chill.

 
6. You can either clingfilm the excess pastry and fridge it to make jam tarts later, or you can get fancy and use it to make a lattice top. If the former, skip to the filling bit below, but if the latter, keep reading folks.
7. Roll out the excess pastry so it's slightly larger than the pie dish, then cut it into strips of about 2cm each. You should end up with 12-14.
8. Cut a sheet of greaseproof paper larger than the dish, and place one of the strips onto the middle of it. Take another and lay it perpendicular to the first, so it lies across the top. Place another in the same direction as the first strip (leaving a gap the same size as the strip itself), between it and the first, and tucking it underneath the second strip. Continue like this until you have a full lattice and each of the strips are used.


Filling
1. This is super simple. Gently heat the golden syrup and treacle in a pan until runny, then remove from the heat and stir in the breadcrumbs, zest, juice and spices.
2. Leave to stand for 10 minutes. If the mixture seems loose then stir in more crumbs, or if it's too stiff then add more syrup until you're happy with the consistency.
3. Spoon the filling into the pastry case, taking care not to compact the mixture.
4. If you've made a lattice top, slide your hand underneath the greaseproof paper and lift it. Bring it close to the tart, and then flip it in one swift motion. Remove the paper and trim the edges of the lattice, then brush with a beaten egg.

 
5. Bake for about 30 minutes at 190°C, until the pastry is golden. And then enjoy thoroughly - with cream/custard/ice-cream if convenient. If inconvenient, do it anyway.


Sunday, 6 January 2013

It's Been a While...

Because life has been insane. 
Since I got elected Communications Officer at the SU life has been manic, and with uni work, getting ill and general life being crazy I had to give up a few things to make things work. Watching Downton Abbey and writing this blog were just two of them, and I sincerely apologise. (Mainly to Bryony. Bryony I'm sorry...)

BUT HEY, HERE'S A GINGERBREAD HOUSE TO MAKE UP FOR IT.


Every year for the last four years I've made a gingerbread house. It started off back in 2009 because I was ill and needed things to do and I've never really been a fan of christmas so I figured I'd make a gingerbread house to give me something to look forward to.

House of 2009
House of 2010
House of 2011


Since then, this epic undertaking has significantly upped the stress levels of cooking for christmas, with structural collapses and smartie shortages really taking a toll on my nerves every year. But it's entirely worth it, just because I'm a show off like that.

I always use this recipe from BBC Good Food. The gingerbread is amazing but the template is a bit small, so I usually print it off bigger so that the largest piece fills a whole side of A4.

In 2011 I attempted a gluten free gingerbread house. It did not go well. I ended up building a giant wall of shortbread to support the inside walls because the walls kept collapsing and it was awful. This year I did it with half wheat flour and half gluten free, for sanity's sake... I also made some structural supports for the inside that made the whole thing hold together like a dream.
The shortbread wall of 2011
The nice, neat structural supports of 2012
My main tip when it comes to making a structurally sound gingerbread house is to make the gingerbread nice and thin. This may sound counter intuitive - you want it to be sturdy and thick right? But actually, the thinner the gingerbread the drier it bakes in the oven, and the less moisture it absorbs over time. This makes it all much more stable and less likely to collapse, trust me on that one... The recipe suggests rolling it out to the thickness of a pound coin and this seems about right to me.


 Decorations? I highly recommend Smarties. Theyre awesome for gingerbread houses. Also Cadbury's chocolate fingers, because they look almost like logs on a log cabin, and my mother loves Terry's chocolate orange and they usually make a good apex for the roof. I used Malteasers on the back and chocolate buttons around the house as a sort of garden.

So there you have it. Gingerbread houses are not impossible. They're not easy but the finished product is entirely worth the trouble it takes to get it all together, so next year you should definitely have a go.

Saturday, 29 December 2012

Merry Christmas (with biscuits)

We've had some sort of biscuits at home at Christmas for as long as I can remember, and a few years ago I started adapting a recipe for traditional Speculaas biscuits. As well as being super yummy, they also make great presents - either for Christmas presents or post-Christmas thank yous. Also you're allowed to make them after Christmas so long as you're still within the twelve days of it, I've decided. So GET BAKING PEOPLE.


Ingredients:
- 200g/8oz plain flour
- 2tsp cinnamon
- 1tsp ground ginger
- 1tsp nutmeg
- 1tsp baking powder
- ½tsp salt
- 100g/4oz soft brown muscovado sugar
- 2tbsp milk
- 150g/5oz butter
- 2tbsp glacé ginger
- 1tbsp candied peel
- zest of 1 orange
- zest of ½ lemon
This is meant to make 24, but I used a variety of cutters and ended up getting 40. But honestly? You can't really have too many biscuits.


1. Preheat the oven to 180°C, and line a baking tray with greaseproof paper
2. Mix the flour, salt, baking powder and spices in a bowl, then rub in the butter. Add in the sugar, mixed peel, glacé ginger and zest and mix well to combine.
3. Add the milk, a little at a time, and use your hands to bring the mixture together into a soft dough.
4. Turn out the dough onto a floured surface, and roll out to about 0.5cm thick. Cut out your shapes and use a spatula to help transfer them to the baking sheet.

Tip: there'll probably be bits of flour on the biscuits from rolling out - if you dip a soft brush or even just your finger in a bit of water you can use it to brush the flour off and ensure an even colour after baking
5. Bake for 15-18 minutes - they should be puffed up and turning golden brown. Let the biscuits cool for a few minutes before transferring to a wire rack.

You can decorate them however you like - I mixed some icing sugar with the juice of half the orange I'd zested, put it in a plastic bag, cut off the tip and iced around the edges of my shapes. I also stuck on some dried cranberries, and added edible glitter to a few for that extra festive sparkle.


So, enjoy! A very merry Christmas to you all from myself and Zosia, and all the best for your 2013s!

Wednesday, 31 October 2012

Life is a crazy place

Okay. So you may have noticed that neither me or Zosia have been doing as much with this blog as we did last year. As way of explanation/excuse, let me just say that this is basically life at the moment...

By which I mean, life is freaking crazy.

 As well as, y'know, degrees and reading and housekeeping and everything else that means the partying that picture shows is becoming a scarily infrequent thing. 

The other part of my excuse is that this is no longer my only food-writing outlet. Because since September I've had a column in my university's newspaper, The Orbital. So if you're at Royal Holloway then go get a copy. And if you're not, then here's this month's column. Purely because I want to share the foody love with you all, and not because I'm showing off (okay, only slightly because I'm showing off).


Sunday, 12 August 2012

What to do when you win a coconut

First of all, I'm sorry for being a bit MIA recently. Life is mad, especially since I got a job at my local fruit and veg shop (yay vegetables), but I will make it up to you. Starting with this.

Because at the Royal Holloway Summer Ball this year, I won a coconut on the coconut shy. Here is a picture of me with my coconut.

Zosia would like to add here that she really reallllly was very very excited.

I named him Tarzan. I was very very excited and full of ideas of what to do with it... but a month later it was still sitting on my shelf, though at home now as we'd left uni. And then my sister suggested I used it to make some sort of Thai curry. AN IDEA WAS BORN. And my coconut became this:


Which was pretty darn good really.

What you need for a Bryony-style Thai green curry:
- 1 coconut
- 8 spring onions
- 2 cloves garlic
- half a red pepper
- half an aubergine (a whole one would be fine)
- a thumb-size piece of ginger
- 2 chillies (I used 1 red and 1 green, but it's up to you)
- 6-8 new potatoes
- handful green beans
- handful mange tout
- 1 1/2 tsp soya sauce
- 1 tbsp soft dark brown sugar
- 350ml water with half a knorr stock pot or 1 oxo cube
- zest and juice of 1 lime
- fresh coriander
- jasmine or sticky rice, to serve

And the SECRET ingredient (less secret now I put it on the internet in capital letters) is a 'Thai Taste: Easy Thai Green Curry Kit'. Which sounds like a massive cheat, but actually it isn't and is also the best money-saver ever. It includes coconut milk, Thai green curry paste and herbs - which, if you bought them seperately, would come to about £5-6, and I think this was £2ish. So no complaints.

It's quite a lot of ingredients, but I promise nothing is lost and it's totally worth it. This amount served three, but it would be a good one for bulking up and cooking en-masse, too - especially if you get people to pitch in for cost.

1. Start by getting into your coconut. We used a hammer and chisel, but the internet is full of suggestions. Once you're in, cut the fleshy bits into small, thin pieces and dry-fry them in a wok or frying pan until they're toasted. This alone is amazingly nice. Put the coconut water aside, and put the toasted coconut pieces in a bowl to cool down. Meanwhile, put your new potatoes on to boil for about 15 minutes.


2. In the now-empty wok heat up some oil, and then add the spring onions, garlic and ginger. Stir-fry these for a couple of minutes, and then add the aubergine, followed shortly by the green beans.

3. Once the vegetables are starting to colour and the aubergine is beginning to shrink, add the pepper, chillis and Thai herbs. Stir-fry all this for another 5 minutes or so, before adding in the boiled new potatoes (chopped), the curry paste and most of the toasted coconut. Cook for another few minutes.

4. Next, add the mange tout, the coconut water (the stuff that was inside your coconut), the coconut milk, the water and the stock pot/cube. It should be beginning to look more like a curry. Turn up the heat slightly and stir, and add in the sugar and soya sauce. Now is also a good time to put your rice on to cook, though it depends what sort of rice you're using.

5. After 15 minutes or so, your liquid should have reduced by about half, and should now be thicker and more sauce-like (although it isn't a particularly thick sauce, so don't worry). When you're happy with the consistency, add in most of your fresh coriander, the lime juice and most of the zest. Cook for another couple of minutes and then try the sauce and adjust whatever you need (if you need to) until you're happy with it. 

Serve with the rice, and the rest of the coconut, coriander and lime zest. You won't be disappointed.


Wednesday, 23 May 2012

Potato and Butterbean Curry

This has been one of my favourite things for a long time. 

When Mum says "what do you want for tea on your birthday", I often ask for this. It's utterly gorgeous and special enough for an occasion, but it's also relatively simple and easy to make. Winners all round!


I made this the other day at my dad's house in London, and it's somehow different to Mum's despite following her recipe, but Dad tactfully said it was "different but just as good" to avoid argument between Mother and myself. (Side note: I wasn't sure if we should post things that we hadn't cooked AT university, hence the lack of posts for a while, but Zosia pointed out that we're still students and we're still cooking! So looks like you won't be free from us in the summer hols after all, sorry folks.)

THE RECIPE:
- 8-10 small/new potatoes
- 1 onion
- 2 cloves garlic
- 1 or 2 fresh red chillies
- 1 rounded tbsp flour
- 2 1/2 tbsp med. curry powder
- 2 tsp ground ginger
- 1 desert spoon of chutney*
- squeeze of lemon juice
- heaped des. spoon peanut butter
- 400g tinned tomatoes
- 2x 400g tin butterbeans
- 2 bay leaves
- 2/3 large pot of natural yoghurt

*we use our homemade marrow chutney but any would do - best would perhaps be a mango one.

It's a lot of ingredients, but I promise it's worth it. Plus the majority of it is larder-foods, which you can use over and over in other recipes. So there. ALSO this makes enough for 6-8 hungry people, so you can freeze your inevitable leftovers and use on a a lazy-day.

THE HOW-TO:
1. Chop the potatoes into small pieces and boil for 10/15 minutes, until tender.
2. Chop the onion, garlic and chilli(s). Put some olive oil in a wok or large saucepan and fry the onion garlic and chilli until soft - about 5/10 minutes.
3. Add the dry ingredients - the flour, curry powder and ginger - and cook for another 3/4 minutes. At this stage it should look something like this:


4. Add the tinned tomatoes, then fill the empty can 3/4 full with water and add that too. Also add the chutney, lemon juice, peanut butter and bay leaves.
5. Drain and rinse the butterbeans, and add those too. Season, and cook gently for about 20 minutes, stirring occasionally.
6. Add the potatoes. Put on the pan lid (or an upside-down plate if you don't have one) and simmer for a further 15/20 minutes.
7. Add the yoghurt and EAT.

Best served with long grain brown rice and chapattis. At home we make these ourselves, but that's just too much faff at uni so I bought some. Easy peasy. 

If you DO want to make them though (say, if you want to be gluten-free) - the mixture is a heaped tbsp of both white and wholemeal flour per person, drizzled with olive oil and enough warm water to make a dough. This is kneaded and left for at least an hour. It's then cut up into small pieces (4 per person) and rolled out, then dry-fried for about a minute each side and spread with as much butter as you dare.


And there you go. You can add or miss out anything you want - when I did the leftovers for myself and Rebecca yesterday I added some more ginger and a desert spoon of wholegrain French mustard. Plus, Rebecca said it was the best thing she'd ever tasted in her life. Beat THAT.